Podcasting for iTunes & iTS podcast directory
This podcasting tutorial will provide you with information you need to create a podcast of your own and get it listed properly on the iTunes Store podcast directory. Links are provided to other tutorials for the basics of recording your podcast as this tutorial goes more into the additional steps needed to enhance your podcast audio file and RSS feed to best take advantage of iTunes and iTunes Store (iTS) podcast directory, using iTunes to convert to MP3 and add ID tags, image/icon creation, and creating links to iTS from your web site.
We started our first podcast in November of '04 for MAPI.com. It grew slowly over the months. When Apple Computer released iTunes 4.9 on 28 June '05 everything changed. Suddenly millions of people had an easy way to find, subscribe and listen to podcasts. The MAPI.com podcast became so popular that it forced us to move to an unlimited bandwidth account. We then modified our feed to take advantage of iTS. This tutorial, written in July '05, is a result of that experience. Though tools for managing podcasts have been created since (Apple's Garageband, for one) this tutorial still remains relevant in understanding rss feeds and adding a podcast to the iTunes.
With iTunes 4.9 Apple has added a few new tags that can be added to your RSS feed to better take advantage of iTS podcast directories layout and features. Though Apple provides a PDF file on how to use them, a real-life practical guide is necessary. This is that guide.
Podcast Basics / Why Podcast
Podcasting is a 'made-up' term to describe a specific process: an MP3 audio file AUTOMATICALLY being sent to a user's computer which AUTOMATICALLY loads it onto their iPod or other audio device. Since podcasts are actually discreet (as opposed to streaming) files they can be listened to anywhere in the process: right from a web page (like My Yahoo) or from your computer using iTunes or other software, or from your iPod. You do not need an iPod to enjoy a podcast but AUTOMATICALLY getting fresh audio content right to your iPod that you then listen to during your morning commute or walk in the park is what podcasting is all about. See www.mapi.com/podcast/six_ways.mov to see what a podcast looks like when being played on an iPod.
A podcast is made up of an RSS 2.0 (Really Simple Syndication) feed with a link to an MP3 file. An RSS feed is just a web page, set up in a specific way. That RSS feed web page has title and description information about the podcast channel and title, MP3 link, and description information about each specific podcast. See www.mapi.com/podcast/rss.xml for the MAPI xml file that runs their podcast.
An MP3 is an audio file format. It is a popular way of sending music over the Internet. MP3's are the audio portion of an MPEG2 AV file. MPEG2 is currently used in satellite broadcasts and DVDs. (The next generation of satellite receivers and DVDs will use MPEG4 AVC)
Once the audio MP3 file and the rss.xml web page are created they both are posted to the Internet. The rss.xml page merely has a link to the audio file, not the actual audio file, so it is quite small.
Recently an article appeared that stated:
"The number of people who download free serial audio programs, or podcasts, is set to explode over the next few years, according to a new report," Alorie Gilbert reports for CNET News.
"Researchers at The Diffusion Group predicted this week that the U.S. podcast audience will climb from 840,000 last year to 56 million by 2010. By that time, three-quarters of all people who own portable digital music players will listen to podcasts, up from less than 15 percent last year, the digital entertainment research group said," Gilbert reports.
Remember how you missed the last "big thing" and told yourself you'd get in early on the next big thing. This is it. Though it will be a while until there is money to be made podcasting it is going to get HUGE. Jump in now and keep plugging away.
Recording Your Podcast / Using iTunes
The first step in creating your podcast is to record the audio. I am not going to go over that in this tutorial as there are such tutorials already on the Internet. Below are a few links to some I have found useful.
However, since you asked, here is the quick version of how I record and post a podcast for MAPI.com.
Start Audacity. Set the microphone input to .8 to allow for a little enhancing afterward. Record audio. Select all of the recording and in the Effect menu select BassBoost.... I use the default settings to boost the base of my recordings. This is needed as I have a USB microphone (Telex M-560, similar to this one). Select all recording and in the Effect menu select Amplify...
Export as AIFF to the desktop. Drag the file into iTunes. Select the file and Get Info to change the information as appropriate and embed the image icon. Right-click on podcast (Control-Click) and select Convert to MP3. Select the new file before it is finished converting so I know which is which. Once complete, drag the MP3 to the MAPI podcast folder. Take all the spaces out of the file name. Modify the RSS feed and podcast archive page with the information for this podcast. Upload to the Internet. Test RSS feed using Firefox to see text based errors. (hidden carriage returns) Test RSS feed using Safari and click on the audio link. Ping Last 100 Podcasts. Done.
Lets take some time to go over this process in more detail. Recording you podcast is first, and again, I'm not going to go over that. There are many step by step guides on the Internet describing how to do so, create the feed and use iTunes 4.9. Here are a few pages I've found useful.
A Podcast of Your Own - Tools and techniques for making your voice heard
Start your own Podcast - Macworld
Give your podcast professional polish with Audacity - (I use Audacity)
How to Create RSS / XML Feed for Podcasts - Podcast411.com
RSS 2.0 Specification - Harvard Law
How to Publish a Podcast on iTunes Store - PDF from Apple
Step-by-step: New iTunes makes it easy to join podcasting phenomenon (Using iTunes)
Assuming you now know everything you'd need about recording your podcast, RSS 2.0 feeds and using iTunes Store podcast directory from the linked pages above, let's go on from the part where you have created a high quality recorded audio file.
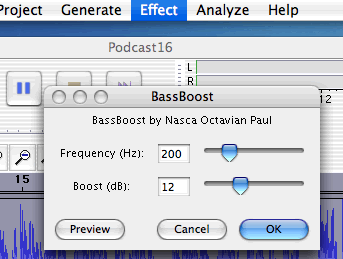
Wait a minute. I have to mention one thing about Audacity. It is a great, free program. It will do everything you need for podcasting. However, the audio I get from it sounds better if I boost the bass after I record since I have an older USB boom mic. Select all of your recording and in the Effect menu select "BassBoost...". I use the default settings to boost the base of my recordings.
 .
.Embedded Image / Icon
You will need to create an image/icon for your podcast. I recommend that you create three versions of your logo image. One each for use in iTS, for embedding in your podcast MP3 and the last for other directories and your web site.
iTunes, like many other podcast directories, uses an image you specify in its listing of your podcast. It is a good idea to create an image specifically for the iTS, taking into account its special needs and features, since you can specify an image link just for iTS. You only get one chance with this image so make it good and test it before you ask for acceptance into the iTS. Take a screen shot of iTS and place your image in it to see how your podcast listing will look once it is accepted. (See screen shot below)
iTS uses your image in two ways: as a 54 by 54 pixel image icon and as a 170 by 170 pixel image. It places a 1 or 2 pixel grayish line around the top and sides for a slight drop-shadow effect. As of this writing, your images will be on a purple background, unless it is a featured podcast in which case it will be also over a white background. The maximum size image accepted is 400 by 400 and the minimum is 120 by 120 pixels.
You will want to design an image that can be read or at least recognized at both sizes and look good over all backgrounds. I recommend making your final image to be 340 by 340 pixels, twice the size that is currently used by iTS. This way it will be exactly halved when used as a large image and will have plenty of pixels to get a good small icon, even though it is not an even size reduction.
For the image to be embed into your MP3 file save another version of your image that is 157 by 157 pixels. When you embed this image into your MP3 file (see below) it will appear in the bottom left of iTunes and on some iPods.
Finally, for use in other podcast directories, create another version of your image at 170 by 170 pixels, then add a light gray outline and a drop shadow. This will make the image slightly larger than 170 by 170 depending on the size of the shadow. The drop shadow brings out your image in these white backgrounded directories and this size fits well. The link to this image will be placed into your RSS feed.
In summary, I suggest you created the following:
- image.jpg at 340 by 340 pixels for use in iTS
- image1.jpg at 157 by 157 for embedding into your MP3 file
- image_sh.jpg for use in other directories
Place a link to image_sh.jpg in the <image><url> tag of your podcast feed. For using the other two images see the next two sections. For now, you may upload images 1 and 3 to your web host.
Using iTunes To Finish Your Podcast MP3
Once you have your podcast in a high quality format (for Macintosh I use AIFF) drag it into iTunes. You can drag it over the iTunes icon or open iTunes and drag it to the Library. Sort by reverse alphabetical album name (click album name twice) to bring the new podcast with a blank Album name to the top of the library.

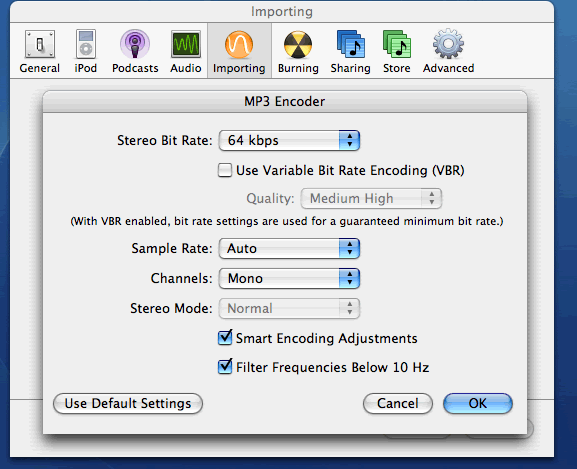
Before we go on, make sure your iTunes importing preferences are correct. Select iTunes >> Preferences... >> Importing. For Windows you will find the preference settings at Edit >> Preferences... >> Importing. For both Mac and PC select the Import Using: MP3 Encoder. Under Setting: select Custom... then set up the MP3 encoder as pictured. (Windows looks slightly different)
Now convert the file for podcast use. Select the podcast by clicking on it once. Then right-click to activate the contextual menu (or Control-click for Mac) and select Convert Selection to MP3. Or you can go to the Advanced menu and select Convert Selection to MP3.
The file will start to convert. Select it as it is doing so so you can tell which file is your MP3 file without having to 'Get Info' since the file will convert with the exact same name. Once it is finished converting, and is no longer grayed-out, you'll need to add information to the MP3 ID tags.
Select the newly converted MP3 file and Get Info by either Command - I (Mac), Control - I (PC), File >> Get Info, or activate contextual menu and Get Info. Either way, you will see a summary of your file. Make sure the Format states MPEG-2, Layer 3. Then select Info and fill in the tags as appropriate. See image below.
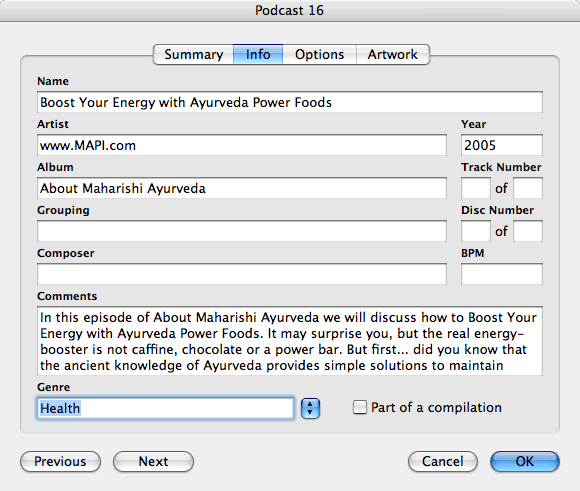
If you do not have a selection in the Genre section that corresponds to your desired iTunes category select Custom... from the pull down menu and type in the category name. See image above.
Finally, embed an image (#2 from above) into your MP3 file. Select Artwork >> Add... then browse to the correct image and press Choose. Use the slider on the right to zoom, if needed, however if you made the image specified above that will not be necessary. Click OK to finish.
Next, drag the newly named file from your iTunes library right into the folder on your hard drive you use to store your podcast files. Select the file and remove all spaces, replacing them with underscores. Your MP3 file is now ready. You may upload it to the Internet if you so desire.
Enhancing Your Feed For iTunes
This section assumes you have an RSS feed as mentioned in the RSS 2.0 Specifications linked above. (If you don't, grab the code from the MAPI.com podcast using a non-RSS enable web browser like Firefox or Download Link in Safari and change it with your specific information)
We will go over the additional tags Apple has added for use in the iTS podcast directory as outlined in the PDF document How to Publish a Podcast on iTunes Store. Adding information to these tags helps your listing within iTS make maximum use of all the additional features it offers.
The additional tags that go in the main part of your podcast feed, with how they are filled in for MAPI.com, are:
<itunes:author>www.MAPI.com</itunes:author>
<itunes:owner>
<itunes:name>Maharishi Ayurveda Products</itunes:name>
<itunes:email>podcast@mapi.com</itunes:email>
</itunes:owner>
<itunes:link rel="image" type="video/jpeg" href="http://www.mapi.com/podcast/about-maharishi-ayurveda.jpg">About Maharishi Ayurveda</itunes:link>
<itunes:category text="Health">
<itunes:category text="Diet & Nutrition"/>
<itunes:category text="Fitness"/>
<itunes:category text="Self-Help"/>
</itunes:category>
Click on the image for a larger view to see how each tag is used within iTS. Those tags that do not begin with <itunes: are regular RSS 2.0 tags.
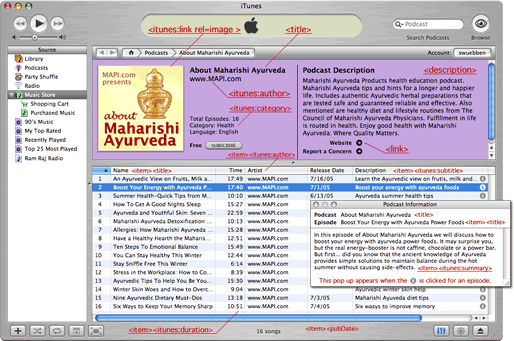
click image for a larger view
The image above also shows how the following tags added to the <item> tag (that describes each episode) are used within iTS. I place them at the end of the <item> tag to keep all the iTS tags in one place. The tags, and how they are filled in for an episode of About Maharishi Ayurveda, are as follows:
<itunes:author>www.MAPI.com</itunes:author>
<itunes:subtitle>Boost your energy with ayurveda foods</itunes:subtitle>
<itunes:summary>In this episode of About Maharishi Ayurveda we will discuss how to boost your energy with ayurveda power foods. It may surprise you, but the real energy-booster is not caffeine, chocolate or a power bar. But first... did you know that the ancient knowledge of Ayurveda provides simple solutions to maintain balance during the hot summer without causing side-effects.</itunes:summary>
<itunes:category text="Health">
<itunes:category text="Diet & Nutrition"/>
<itunes:category text="Fitness"/>
<itunes:category text="Self-Help"/>
</itunes:category>
<itunes:explicit>no</itunes:explicit>
<itunes:duration>17:40</itunes:duration>
<itunes:keywords>maharishi ayurveda health diet power food summer drinks</itunes:keywords>
</item>
Link to iTunes From Your Web Site
You can create a direct link to your podcast subscription page in the iTunes Store podcast directory for use in a web site or email. It works for both Mac and Windows computers... if iTunes is already installed. Click this link to the MAPI health podcast and watch the magic. Oh... but it came right back to this page... patience... wow, now iTunes has started and, hey look, it is at the About Maharishi Ayurveda podcast page. One click and the users has subscribed. That is cool.
The way you create one for your podcast is simple. Create a regular HTML link that goes to http://phobos.apple.com/WebObjects/MZStore.woa/wa/viewPodcast?id=73329653. Instead of the last 8 numbers you place the number that the iTunes Store has created for your podcast. One way to find out the number is to right-click (Control-click) on your image and from the contextual menu select Copy iTunes Store URL. Paste that URL onto your web page and you're all set.
Another way is this: navigate to your podcast in the iTS and drag your image to your desktop.
Open the file that is placed on your desktop in a text editor. The code within the <string></string> tags is the URL for activating iTunes and automatically navigating it to your podcast subscription page. It will contain code similar to this:
<dict>

<key>URL</key>

<string>http://phobos.apple.com/WebObjects/MZStore.woa/wa/viewPodcast?id=73329653</string>

</dict>
You can even link your URL using an image, like so:

Here is another link you can add to your web site. With iTunes 4.9, Apple introduced two new URL types. So it is now possible to create a link that, when clicked, immediately subscribes a users to your podcast within iTunes, though this is "Mac only" for now. Use itpc:// or pcast:// instead of http:// in a link to your RSS feed. itpc://www.mapi.com/podcast/rss.xml will work for the MAPI.com podcast. See this page for more information.
Other Links On Your Site
My Yahoo is a popular way of listening to podcasts. It is easy to create a link so users can subscribe to your podcast. The URL for the MyYahoo link for the MAPI.com podcast is as follows: http://add.my.yahoo.com/rss?url=http://www.mapi.com/podcast/rss.xml. Replace everything after "url=" with the link of your podcast RSS feed and you're all set. You can even use an image.
Newer web browsers have support for directly reading RSS feeds. Safari currently has this feature and Internet Explorer will do so sometime in the future. Use feed:// instead of http:// in a link to your RSS feed. For the MAPI.com podcast it will be feed://www.mapi.com/podcast/rss.xml and can be used like so:
Submit Podcasts to the iTunes Directory
Once you have a few podcasts under your belt, your images created and your feed optimized for iTunes and iTS, submit your podcast to the iTS podcast directory. iTunes Store will look over your podcast and, if it meets their guidelines, in a week or so include it in their directory.
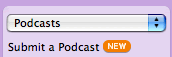
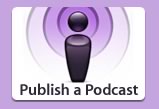
Here are three ways to submit your feed to iTS.
1 - From the Podcast page within iTS click on the Submit a Podcast link.
2 - From the Podcast page within iTS click on the Publish a Podcast image.
3 - Or if you have a Mac, Click Here to Submit to iTS podcast directory. (Mac only)
Once on the Submit Podcasts to the iTunes Directory page within iTS type the URL of your podcast feed into the Podcast Feed URL: box. Press Continue and wait.
Conclusion
This tutorial was recently (fall of '05) used to create another podcast: Answers From Maharishi so I know it worked at least once. :-)
Enjoy!
Also, see our world famous and New York Times recommended Video Conference Tutorial for iChat and AIM, and Fine Art by Lise Claire Wuebben of Bordeaux, France.
Need an experienced web designer for your NetSuite web site? Please look over the rest of my site. To get with the mobile revolution using your NetSuite web site account see: NetSuite Mobile Web Site Bundle for SiteBuilder Users.